

The User Administration page is used to add and maintain Users within HANDS. This includes their access, disabling an account, title assignment, and Trainings. The user's address and phone number information is captured and maintained on this page as well.
Information is organized by: Staff ID, Username, First Name, Last Name, Account Disabled, and Access to State Agency.
From the home page in HANDS click on Ops Mgmt on the main menu bar. Click on the navigation drop-down list to view the different pages within Ops Management.
User Administration Search
1. From the drop-down navigation list select User Administration. The User Administration search page displays.

2. Enter the search criteria, User name, First Name, and/or Last Name and click the Search button at the bottom of the page. The page will display search results.
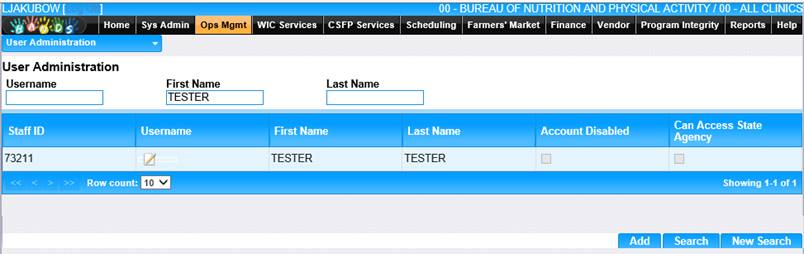
3. To perform a new search, click the New Search button at the bottom of the page. The entered search criteria will be cleared, and the user can enter new search criteria.
View/Edit an Existing User Account
1. Click on the Username in the search results. The user information is displayed.
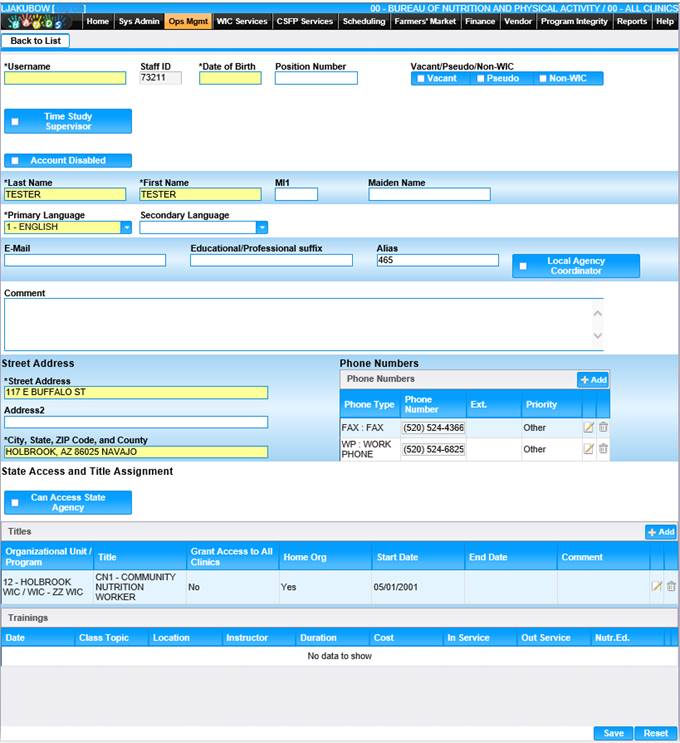
2. Add/Edit the information on the page.
3. To discard unsaved changes, click the Reset button at the bottom of the page.
4. To save changes, click the Save button at the bottom of the page.
5. To return to the main User Administration page, click Back to List.
Add a New User Account
When adding a new user to HANDS, the user must first have an account created in the active directory. This means a request for a new user must be submitted to the Help Desk prior to creating a new user in HANDS. Once the request has been completed by the Help Desk and the user has the Username, follow the directions below to add a user.
1. On the User Administration search page click the Add button at the bottom of the page. The blank user page displays.

2. Enter the Username provided by the Help Desk. Enter all the required fields and any other appropriate fields to add the user. At least one Primary Phone number is required.
3. Select all applicable check boxes for Vacant, Pseudo, Non-WIC, Account Disabled, Local Agency Coordinator, Can Access State Agency.
4. For a user to be able to access HANDS, a Title must be added. Each Title has roles assigned to it which will enable the user to access certain functions in HANDS.
5. To enter a Title, click the Add button on the Title grid. The add window displays.
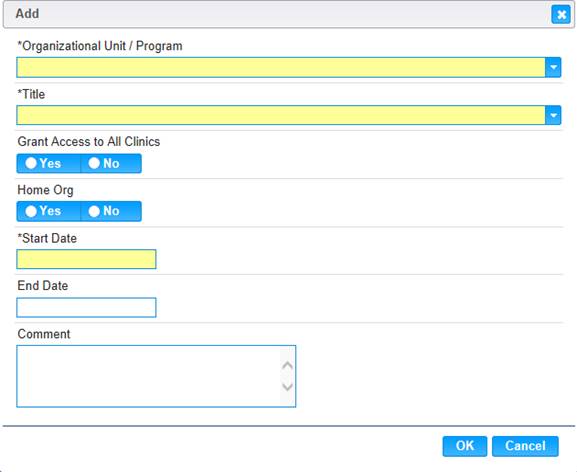
6. Enter all required fields and any other appropriate fields to add the Title record. There needs to be at least one Organization that is the "Home Org" for each user. Selecting Yes will ensure that when the user logs in each time, the default organization will be selected automatically. The user can change the Organization if they have access to more than one.
7. To discard changes and close the window, click the Cancel button.
8. To save changes, click the OK button.
9. To clear all entered values and begin again, click the Reset button at the bottom of the page.
10. To save changes and create user, click the Save button at the bottom of the screen.
11. To return to the main User Administration page, click the Back to List.