

The Food Package page is where a user can search for food packages, edit food packages, and add new food packages.
1. From the System Admin home page, click the Food Packages link in the Food Benefits section. The Search Food Packages page displays.

2. Enter the search criteria for the package you want to view. The search results will display in the bottom portion of the page.
Add Food Package
1. On the Food Packages search page, click the Add button at the bottom of the page. The Add Food Package page displays.
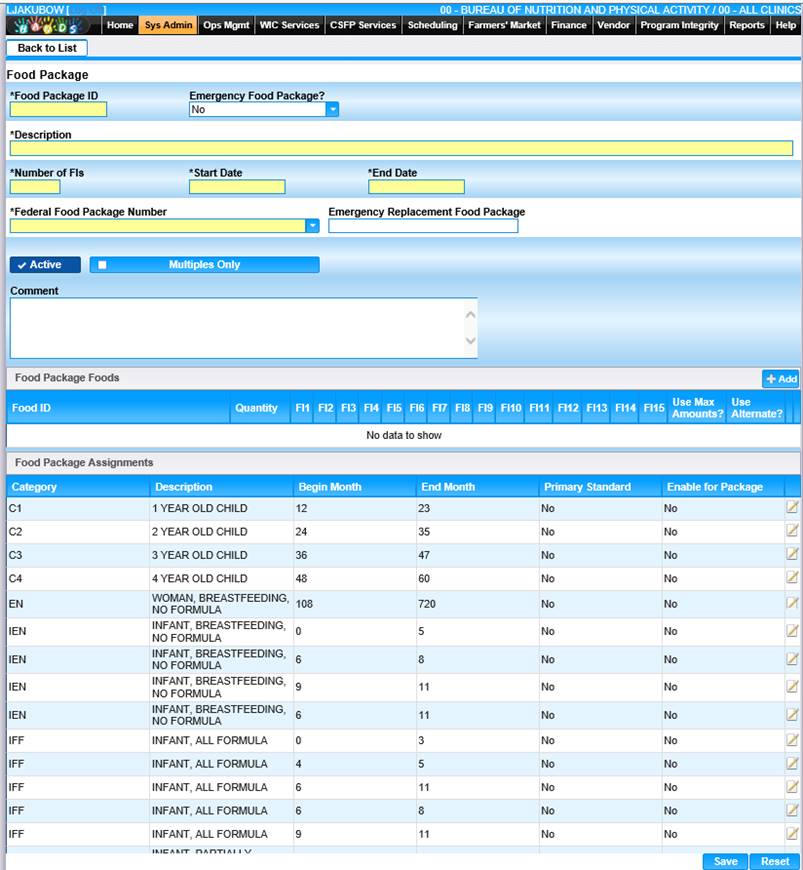
2. Enter a Food Package ID and a Description for the Food Package. The Number of FI's field determines how Many FI's a Client will receive per month. The Start and End Date fields determine the date range in which the food package will be active for.
3. The Food Package must contain at least one or more foods and at least one category must be enabled for the package.
4. If the Start Date is in the future even if the Active Flag is set, the package will not be available for Assignment. If the End Date has passed, even though the Active flag is set, the Package will not be available for Assignment.
5. Select Federal Food Package Number and enter Emergency Replacement Food Package if applicable.
6. Select Multiples Only flag for a pregnant woman carrying multiples or postpartum women nursing multiples.
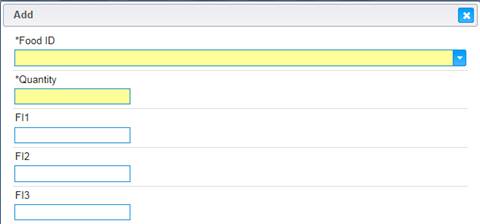
7. Click the Add button in the Food Package Foods section. The Add window displays.
------------------------------- page split ------------------------------
8. Select a Food Id, enter a Quantity and all applicable fields.
9. Click on the Edit icon for a search results record.
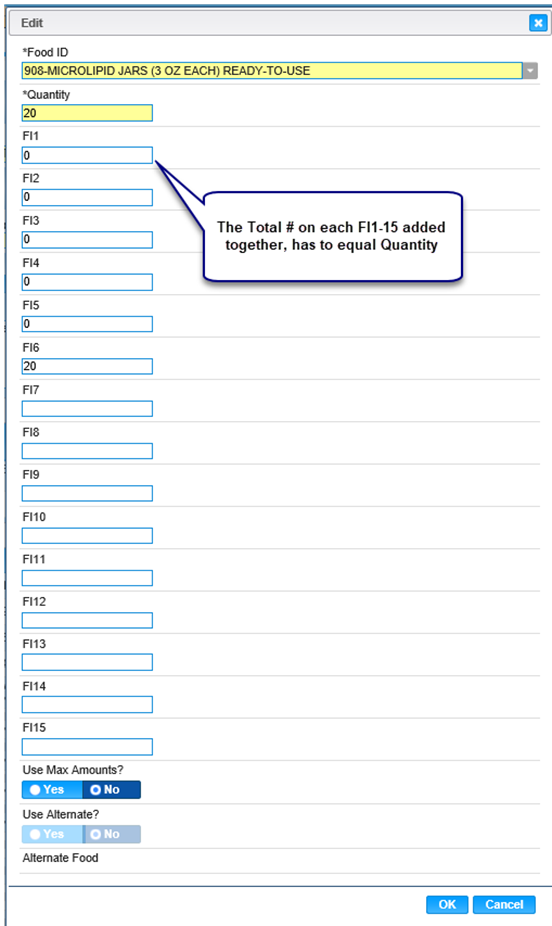
10. Select a Food ID and Enter a Quantity amount.
Distribution of Quantity over FI's rules
• The quantity entered must equal the total distributed over the FI's.
• The user is only allowed to distribute the quantity the number entered in the Number of FIs field.
• Two formula food items cannot be Distributed on the same FI.
• A formula food item cannot be placed on the same FI as a non-formula food item.
• Substitution (OR) foods must have their quantities distributed over the same number of FIs. For example: Peanut Butter and Beans are substitution foods. Peanut Butter is on FI 1 and 2. Beans will also have to be distributed on FI 1 and 2.
Note: The Use Max Amounts? field determines if the Food will be using the max amount records that were created on the Maximum Amounts page. Selecting Yes means that the Food item will be using its maximum amount records for the categories and age ranges that the food package will be assigned too. Selecting No means that the Food item will not being using is maximum amount records.
Note: The Use Alternate? field determines if the Food being added will use its alternate month food. Selecting Yes means that the Food item will be using its alternate food when checks are printed from the package. Selecting No means that when checks are printed from the package the Food item will not change per month with its alternate month food.
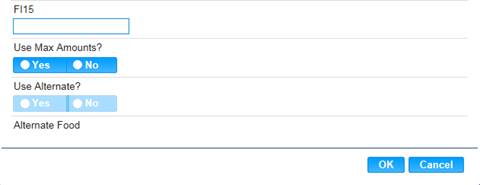
11. To discard unsaved changes, click the Cancel button.
12. To keep changes, click the OK button. Repeat these steps for each food item in this package.
13. In the Food Package Assignments section, click the edit icon for the category you want to enable for the food package. The Edit window displays.
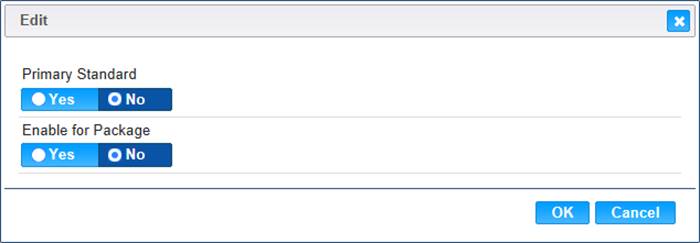
Options for enabling food packages for assignment: (Refer to the Clinic User Manual for more information on the Food Package Assignment page.)
• Selecting Yes for the Enable Food Package section will make the package available for selection for the selected Category and Age Range on the Food Package Assignment page. However, the package will not appear by default (As a standard food package).
• Selecting Yes for the Primary Standard and Enable for Package sections will make the food package appear for the selected Category and Age Range on the food package assignment page. The package will appear in the default section of the page.
• Selecting No for both sections will not make the Food Package available for selection on the Food Package Assignment page for the selected Category and Age Range.
14. To discard unsaved changes and close the window, click the Cancel button.
15. To keep changes, click the OK button.
16. Repeat these steps for all desired categories.
17. To discard unsaved changes on the Food Package page, click the Reset button at the bottom of the page.
18. To keep changes on the Food Package page, click the Save button at the bottom of the page.
19. To return to the main Food Package page, click the Back to List button.
Edit Food Package
1. Click on the Description link on the search results for the food package you want to view/edit. The Food Package page displays.
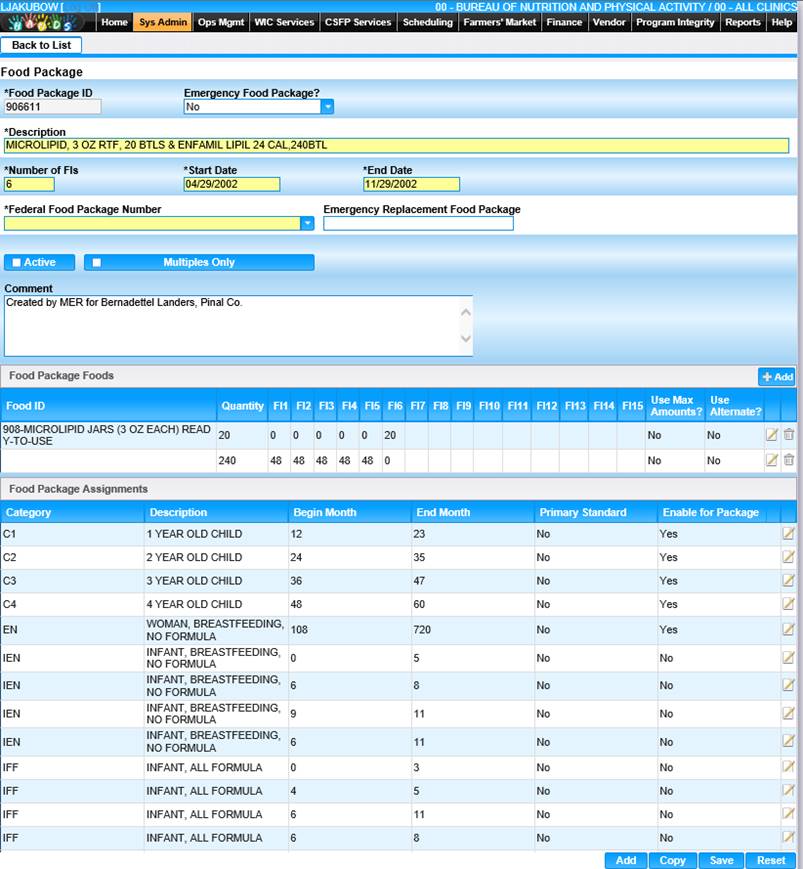
2. User is able to update all Yellow Fields, comment field and Category of Food Package Assignment even if Food Package is prescribed to a Client. Unable to Edit Food Package ID, Number of FI's and Food Package food Fields.
3. Select the Active check box for this food package to become active.
4. To discard the information entered, click the Reset button at the bottom of the page.
5. To keep the information entered, click the Save button at the bottom of the page.
6. To create a new food package that is close to an existing food package, click the Copy button at the bottom of the page. This copies the information of this food package to a new entry.
7. To return to the main Food Package page, click Back to List.